

APPLE SMOKED CHILI MAGIC
–
–
I love chili, especially when it’s going to be cold for a few days. Well, the weather outside is cooperating with that agenda and #ChiliRecipe is once again on the menu.
I planned ahead with this one and thought I’d do an experimental chili recipe along with the Bourbon Stew recipe that has warmed my heart (and tummy) through the years. The experiment started with a Chuck Roast during a typical weekend cooking spree on the #Traeger. In this case, our signature flavor was Apple and we built around it for a fantastic chili alternative.
Here’s your step-by-step
how-to-make-magic-happen
inside scoop.
–
Your Chili Ingredients are…
Here’s the laundry list of what you’ll need to batch up this unique recipe. We’ll cover the step-by-step on smoking the roast first and then launch into some basic crockpot chili guidelines and final stages of preparation.
|
|
–
Smokin’ the Chuck Roast…
| There was a time when I bought all of the meat fresh from the butcher for each weekend’s Traeger cooking adventure. It cost more to do it that way, but I never liked the idea of freezing meat and felt that I could taste the difference. Several months ago, I purchased a vacuum sealer and resolved that problem. The image to the left leads to the one that I purchased through Amazon for $108 on sale. I’m glad I made the purchase and believe that the investment will pay for itself over a short period of time, as I can now focus on buying a cut of meat only when it is on sale. I mark the cut of meat, the weight, the date sealed, and the price per pound on the package before sealing. |
Now, let’s thaw out a chuck roast and prep it for the #Traeger. If it’s been vacuum sealed, you can thaw it by just putting it in the sink and letting it sit overnight, or you can put it in the sink with a bowl full of water on top and fill the sink to the point where the roast is submerged. Since the meat is vacuum sealed, the thaw method doesn’t seem make much difference. I don’t bother to fill the sink with hot water because the roast is frozen and the hot water is going to be room temperature within 15 minutes or so anyway. Roasts that have been submerged in water are usually fully thawed within 2 to 2½ hours.
This roast is scheduled for time in a crockpot, not a centerpiece on a dinner table surrounded by roasted potatoes and carrots. For that reason, I’m more concerned with the smoking than the searing. I don’t want an outer crust on this one, but I do want a thorough smoke flavor throughout the meat. For that reason, we’ll never turn the temperature above smoke and we’ll smoke it for a little longer than normal.
Making Dry Rub and Mop Sauce…
The Dry Rub Mixture
|
The Mop Sauce Mixture
|
–
Before it goes on the #Traeger, it gets a full rub down with a special blend of brown sugar and spices. You’ll see that blend above and the step-by-step of how to measure things out. Once properly measured, I pour the ingredients into a Ziploc bag and blend them as well as possible. Afterwards, I pour them into a leftover Lawry’s Seasoned Salt container and use that to shake them out evenly on the roast. I give it a good covering, but I’m not counting on a crust, so I don’t layer. We’re going to be giving it a bath in the Mop Sauce every hour anyway, which will keep it moist and prevent a crust from forming.
When making the Mop Sauce, you’ll probably want to use a small kitchen funnel and you’ll want put your dry ingredients in first before you get the funnel wet. The measured mixture you see will fill a Dasani water bottle to about the 3/4 point. I use Dasani water bottles because that’s the brand of water we drink. Any container will do for mixing your Mop Sauce. I use a bottle because I prefer my Mop Sauce shaken, not stirred… (sorry, just had to work that in there somewhere).
Here’s the short story on smoking the roast. The grill never goes above the smoke setting. I take the roast off of the grill every hour and soak it in the Mop Sauce. I do this for 5 hours, before wrapping it in foil and putting back on the grill for one final hour to seal in the juices and flavor. The Mop Sauce is designed to keep it from drying out. If I wanted a crust to form, I’d apply the Mop Sauce for the first 3 hours, then give it a fresh coating of dry rub after the 4th time through the bath. Then I’d turn up the grill a couple of notches and cook it for an hour before wrapping it in the foil.
I use the term “bath” for the Mop Sauce application because I don’t like painting the meat while it’s on the grill. That leads to a heavier clean up and more time with the grill lid open. I simply remove the meat and let it sit in a glass baking dish that contains a thin layer of the Mop Sauce. I let it rest for about 2 minutes per side to soak up the sauce, then I put it on a metal rack over the dish so the excess sauce can drip off before I return the roast to the grill. If excess sauce is going to drip off, I’d rather it drip back into the bath than on the drip plate in the grill. I only use enough Mop Sauce to provide a thin layer in the bottom of the glass soaking dish and I reserve ½ cup of the mop sauce to blend into the chili during the crockpot cooking stage.
–
Some basic chili-n-crockpot rules…
Crock pots take a while to warm up. It takes almost an hour on high to even notice they’re on in some cases. Plug in a 7 quart slow cooker, set it on high, and pour in the cans of tomato sauce and diced tomatoes to get things started. Add both cans of black beans to the mix and the measurements of Mop Sauce and Apple Ale as well, then give it a gentle stir. There’s no need to keep watch over the crock pot, they don’t boil unless you leave them on high for several hours and even then, it’s barely more than a hardy simmer. Time it one day if you’re curious (I’m lazy about that sort of thing).
While the crock pot is warming, you’ve got plenty of time to cube the roast and cut up the onion and peppers.
Once the contents of the crockpot are trending toward warm and you can feel the heat through the lid, add the remaining spices and blend them into the mix. I like to add my chopped veggies next, as it gets a little more difficult to stir once the meat is added. I’m going to suggest that you go conservative on the peppers. Everyone’s level of hot is slightly different and you can always add more peppers to the blend later on. You can also add a pinch of crushed red pepper for some instant heat, but you cannot take it out once it’s in. The last thing you want is a chili that’s too hot to enjoy. Also, be gentle with the addition of the salt and pepper. I add a tablespoon each of Lawry’s Garlic Pepper, Lawry’s Garlic Salt, and Lawry’s Seasoned Salt. The tablespoons are not heaping. You can always add an additional sprinkling of salt and pepper as needed, but you cannot take them out. Keep this same thing in mind when it comes to the Brown Sugar. Sugar is sweet, but too much is too much. Be conservative up front and expand your horizons to suit your taste. Everyone’s taste buds are different.
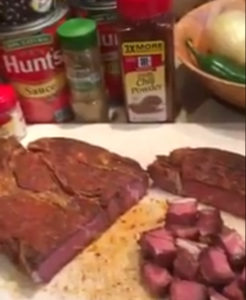
Your last addition to the blend will be the cubed Chuck Roast. Try not to sample too much of it while you’re cutting it up. I know you wanna, but it’s dedicated for the chili. If you struggle with this part, start with a larger Chuck Roast.
I cook my chili on high until it reaches a simmer, then I turn it down to low and let it cook for another 4 to 5 hours before serving. Stir it gently every 30 to 45 minutes.
I hope you enjoy the recipe. Let me know how yours turns out.
–
Quick Links to Mark’s Books on Amazon:
| PUSH Mark D. Combs |
Don’t Forget Your Cape Mark D. Combs |
HELLO… IS THIS ON? Mark D. Combs |
–