

APPLEWOOD SMOKED TURKEY
–
 Two years ago, my wife bought me a Traeger Pellet Grill for my birthday. Supposedly, you can cook anything and everything on it. Maybe that’s true; I haven’t tested the theory. At $20 a bag for wood pellets, I tend to be a little bit judicious as to when I crank it up and what gets a spot on the grill rack. That being said, it gets a fresh scoop of wood pellets nearly every weekend and we’re eating some of the best smoked meat you’ll find anywhere. I’ll proudly put the juicy deliciousness that comes off of my smoker up against “Restaurant Quality” food any day of the week. We eat much better at home, thank you. This Thanksgiving I used my #Traeger to create an #ApplewoodSmokedTurkey that I’m certain I’ll be doing again and again.
Here’s your step-by-step
how-to-make-magic-happen
inside scoop.
–
Here’s your ingredients…
|
|
–
How to make magic happen…
Frozen turkeys take at least a full day to thaw, sometimes longer. If you’d prefer to thaw the turkey in the refrigerator (which isn’t a bad idea, as you’ll see later), you should plan for a 2-day thaw. I’m a mixture of sink during the day and fridge overnight. I can’t explain the fridge overnight part. However you decide to manage your turkey thaw is up to you; I promise not to judge.
Once thawed, you’ll need to remove the interior package of organs and the neckbone. You may have a use for this. Personally, we don’t eat organs and I’ve never made neckbone soup, so I put them in a Ziploc bag and keep them in the freezer until trash day.
Wash the turkey thoroughly. Check for stray feather stems that need to be plucked and give the inside a good rinse. This takes a little time, but no one wants to bite into a turkey feather. Stray feather stems are a meal wreck waiting to happen; be forewarned.
Before… let me repeat that… BEFORE mixing your brine, find a glass container large enough for the turkey and brine. You can use a large food-safe plastic bag inside of a metal pot, but do not use the metal pot without the liner or you will pick up the taste of the metal as a result of the 24 hour soak. Another thing that you will want to work out before you get too far into the process is how you’re going to get the container into your fridge. This isn’t a game of Tetris that you want to play when the pot is full of turkey and brine. At that point, it’s going to weigh about twice what the bird weighed when it was frozen. Toy with this aspect up front and make sure that you’ve picked a shelf that you are confident can support the weight. (Don’t overlook the importance of that last little bit of wisdom or you won’t sleep well). I favor the bottom shelf, even though I have to empty the bottom shelf of the door and remove the railing.
Another birdbath option is a super clean, high-quality cooler. (I wouldn’t use a cheap plastic ice chest for fear of getting some detectible earthy, plastic, sense-of-yuck taste absorbed into the bird. You’re not trying to get fish home from the river. You’re trying to season your turkey with a memory-making, mouth-watering yummy. I don’t want a turkey that has a hint of last summer’s trout as an aftertaste.) You can use some Ziploc bags full of ice cubes to help keep things cool during the overnight soak.
–
Let’s Make Some Brine!
Adjust the amount of brine to suit the size of your turkey. Most of the time, I’m just cooking for two, so my turkey is usually in the 12 pound range. If you have a larger bird, you’ll need a larger container and a little more brine. The recipe is easily adjusted to suit your needs. For each bottle of water, you’re going to use 1 cup of Apple Juice. For every 2 bottles of water, you’ll add 1/4 cup of Brown Sugar. The Montreal Chicken Seasoning is measured at 1 teaspoon per bottle of water and the Garlic Pepper at 1 tablespoon for every 3 bottles. The measurements on the seasonings are roundabouts. If you’re using 4 or 5 bottles of water, add another half tablespoon of Garlic Pepper. The water to Apple Juice to Montreal Chicken Seasoning is a pretty stable ratio; the Garlic Pepper is an approximant, but don’t overdo it.
Heat half of the water and half of the Apple Juice in a pot or sauce pan large enough to give you room for stirring without splashing over the edges. Once heated to a simmer, you can begin blending in the Chicken Seasoning, Garlic Pepper, and Brown Sugar. The pepper won’t dissolve into the water/juice mix, but everything else should. At this stage, you can add the remaining bottles of water and Apple Juice to cool the mixture down. Stir the mixture so that you continue to blend the seasonings as you go.
Some of the seasonings are not going to dissolve. Letting the brine stand for a couple of minutes before you pour it into the soaking container will give them time to settle to the bottom. When pouring your brine into the soaking container, retain the last cup or so. This is where the pepper will have settled and you’ll want to add it once the bird is in the bath.
If you’re using a metal pot, lined with a food-safe plastic bag, be sure to let the heated mixture cool down completely before pouring it to the pot. A high heat could melt the plastic bag and I’m always concerned that even a really warm liquid could cause the plastic to leech a little of its protective coating. It’s best to just be patient and wait until the brine has completely cooled. If you’re using a glass container for your brine soak, you can pour the brine in at any time without much concern.
I like to put a small stainless steel rack in the bottom of the brine container to keep the bird off the bottom. I put the bird in place breast up and then add the brine, pouring the mix gently over the breast of the bird, but I suppose you could pour the brine in first. Regardless the order, you should end up with a bird either totally submerged or almost totally submerged in the bath. The last step is to give the final cup of brine a good stir and pour it ceremoniously over the top. This is where you can say a few words of thanks and bless the bird, if you so choose. I think the bird is going to taste the same either way, but you only get so many opportunities for pomp and circumstance.
You’re ready to store things in the fridge for the soak. I recommend at least 24 hours, but you probably couldn’t tell a 22½ hour soak vs a 27 hour bath. Clock management is your call. I suggest that you roll the bird over every 6 hours or so. This stirs up the brine a little and also makes sure that all parts of the bird are exposed to all levels of the brine.
–
Strut your stuffing!
There’s a long list of stuffing recipes available on the internet for some reason, so I won’t bore you with one here. It’s really not that hard to make and there’s always Stove Top if you just want a stir and stuff option. My stuffing includes the chopped onion, celery, mushrooms, and sometimes apple. I also lead with broth as my liquid “activator” option. Include some butter, not margarine or Country Crock (seriously, I don’t know how they sell that yellow-tinted lab experiment). Sometimes I opt for beef stock over chicken broth for a little bolder flavor. You can also add a tblsp of Worcestershire or maybe just a touch of Sweet Baby Ray’s Kickin’ Bourbon Sauce to punch it up a little bit. Be judicious with that though, sugar is sweet (and I’m a big fan of Sweet Baby Ray’s Kickin’ Bourbon Sauce) but too much is too much.
Hopefully you know where to stuff the stuffing. If not, stop reading this recipe now. Return the turkey before you thaw it. The Drive-Thru is forever your friend.
–
Roasting Your Bird!
I use a Traeger Pellet Grill with Apple flavored pellets for the first hour and a half, followed by Hickory pellets once we get to the final hours of slow cook. I suppose this could work in a regular oven with a few adaptations and preferably a lot less smoke. You might even try a shallow pan of apple juice and pinch of cinnamon on a rack below the bird, if you’re locked into an oven vs a slow smoker.
After I remove the bird from the bath, I allow it to stand on a metal rack in the sink for about 10 minutes to drip dry. I like to leave some standing moisture in place, so I don’t pat it down. I give it a very light coating of Lawry’s Seasoning Salt, followed by a suitable covering of Montreal Chicken Seasoning. When I say suitable, I’m leaving some margin for piling on by you heavy shakers. Don’t overdo it. You’re not flowering a chicken for the fryer. It’s okay if you can still see some of the turkey’s natural skin under the seasoning. You’re going to add just a little more later anyway, so don’t empty the bottle on it just yet.
I like to load the cooking racks of the grill before I start it up. This is primarily because it’s never failed to start and I don’t like sticking my face into a smoke cloud while trying to get something situated on the racks. I’m all about put it where ya want it, close the lid, turn the knob, and walk away. The only hitch in that plan is that the grill starts on the “smoke” setting and I want to cook for the first 90 minutes on the setting that is 2 notches higher. I let it run for about 10 minutes, then turn it up one notch at a time with a couple of minutes between adjustments.
Our goal here is to slowly brown the exterior of the bird, which will create a natural seal for the meat and lock in the flavor. The actual cooking part is waiting in the wings… and the thighs, and the legs, and most importantly the breasts. Seriously, the breasts will be the benchmark for when the turkey is sufficiently cooked, but not overcooked to the point of becoming dry. For the first 90 minutes, a temperature that levels off somewhere around 300 degrees, but not over 300, is the target. This is actually easier with the smoker than it is with a conventional oven, as the oven has hot spots. The smoker will fluctuate slowly between 270 and 300, but never give us a reason to check on the progress or rotate the bird because it’s 38 degrees hotter in the back left than it is in the front right. If you bake, you know that most ovens have that issue.
–
It’s A Wrap!
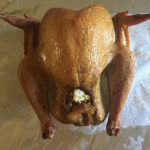 The time has expired and your bird should have a golden brown glow. The image that I’ve provided is our latest bird entering the wrapping stage. Even though I know I’m going to wrap the turkey in 2 layers that run different directions, I still wouldn’t attempt this without the extra wide Heavy Duty Reynolds Wrap. Get the right stuff. If you’re going to buy the off-brand generic foil because it’s $1.29 less, the Drive-Thru is your friend. Stop cooking. In fact, stay out of the kitchen unless you’re brewing coffee or making a bowl of cereal (and I’m iffy on your coffee privileges). For crying in the sink, this is a special project; just buy the right stuff – Heavy Duty Reynolds Wrap, 18 inches wide.
If your turkey is 18 inches from the home of the tail feathers to what used to be the lookout point, figure on needing at least 3 feet of wrap to make it all the way around the bird. On each wrap, you want to make it all the way around twice. So, for a bird that is about 18 inches from bow to stern, you’ll need about 6 feet of wrap. Surprisingly, the measurement from port to starboard across the thickest portion of the turkey is going to be pretty close to the same. If you’re scoring at home, first of all… congratulations, and second… you’ll need another 6 feet of wrap for the 2nd metal blanket. You can tear them off the roll as needed, I just wanted to prep you up front because some of you get antsy and race off into “I’ve-Got-This” euphoria, which could leave you piecing together a metal quilt instead of a nice snuggly wraparound swaddle.
As you’ll see in the picture, I’m working the side to side, port to starboard wrap first. It’s just easier; you can go bow to stern if your inner alpha is wrestling with control issues. I position the bird so that I can make my first wrap completely across the top to about halfway down the side. Invoke your Christmas gift-wrapping skills, if you’ve got experience. You’re looking for the potential of smooth folds on the open ends, if possible. Once I know where the bird will sit, I slide it a little farther up the foil to expose where it will sit when the wrapping starts. (For those of you in the south, we say “further” and we’re good with it, but some people are going to hack me for my grammar.)
Partially unwrap a stick of butter (not Margarine and just shoot me if you’re reaching for a scoop of Country Crock… who are you people that buy that stuff???). Anyway, the foil will still be warm from having the turkey sitting in place and you should see a hint of a footprint (figuratively, it won’t look like a foot) that marks the area you want to coat. Be liberal to the left and right, envisioning the bottom half section of the bird, but don’t worry too much about getting out to the edges of the foil; a lot of that will overlap. Having rubbed the foil down with butter, give it a light coating of Montreal Chicken Seasoning and Lawry’s Seasoning Salt. Again, light is the key. We’ve soaked the bird in seasoning overnight and given it a good sprinkle prior to the first 90 minutes of cooking. We’re trying to enhance the flavor of the bird, not overpower it. If you’re that in love with the taste of Montreal Chicken Seasoning, add a spoonful to your batter the next time you make pancakes and have at it. Use good judgment here; you’re trying to make something special. After dusting the buttered foil, move the bird back onto ground zero.
Cut off about a 1 inch section of the stick of butter and put the rest back into the fridge. Rub the section you cut loose across the exposed top sections of the bird and down the sides. Once buttered, give this area a sprinkle of seasoning. Having buttered and seasoned with care and glee, wrap the foil around the bird and fold the open ends into place as neatly as you can. Don’t wad; you’re going to be adding your second layer and you don’t want to wrap over unruly lumpiness. Spread out your second metal blanket and position your turkey so that you can stretch a section completely across the top to the point of tucking it. That will keep the foil in place as you pull the remaining section across and flip the bird over to continue the wrap. Fold in the open sides neatly, it makes for easier access when the bird is ready to serve. You’ll be able to unfold the sides and cut away the top layer of foil without steaming your fingers.
Before you put your bird back on the grill or in the oven, you need to insert a temperature gauge. A lot of recipes suggest plugging the thigh for some reason. I don’t. I’m more concerned about overcooking and drying out the breast meat. It’s also easy to pin your temperature gauge against the thigh bone, which will give a false reading. With the tip of a knife, poke a small hole in the foil to clear a path for the gauge. Then, insert the temperature gauge into the middle portion of breast. The target cooking temperature is between 160 and 165 degrees. The bird isn’t done at 153 and it will start drying out as you approach 170. I cook on the Traeger smoke setting, which gently fluctuates the temps between 175 and about 200. In a conventional Oven, I’d suggest 200 to 225 degrees and plan to spin the turkey every 30-45 mins for even cooking. Cooking time is somewhere between 4 and 4½ hours. The temperature gauge has the final say as to when I pull the bird out of the smoker.
A turkey is one of those things that you cook once or twice a year. If done right, they’re really delicious, but since we don’t cook them on a regular basis, the whole process can become a point of anxiety. I hope this recipe helps you enjoy the next time you’re called upon to embark on a turkey roasting adventure. Let me know how yours turns out.
–
–
Quick Links to Mark’s Books on Amazon:
| PUSH Mark D. Combs |
Don’t Forget Your Cape Mark D. Combs |
HELLO… IS THIS ON? Mark D. Combs |
–