CHINESE STYLE RIBS
–
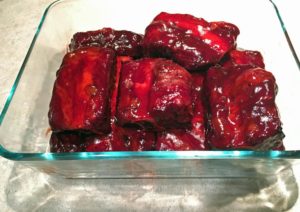
This is another fantastic memory that you can make with the help of a #Traeger Grill. I’ve experimented with this one several times, because I’ve always loved Chinese Style Ribs, and I believe I’ve finally come up with something worthy of sharing. For the record, I used to fly by the seat of my pants in the kitchen. After all, cooking is “an art” right? It’s certainly creative and artistic, but when I stumbled into something that I wanted to be able to make again, I found myself hard pressed to repeat it with any accuracy. How much ginger did I add? Does this one get honey and brown sugar? Did I use soy sauce or Worcestershire for this brine? I had to start writing things down. Thus, the recipe blogs began…
–
Here’s your step-by-step
how-to-make-magic-happen
inside scoop.
–
Here’s your ingredients…
MARINADE
BRINE
|
GLAZE
|
–
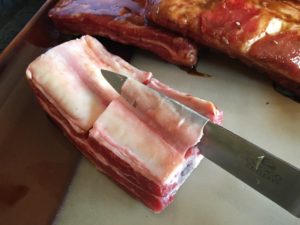
A Quick Word about Beef Ribs
 |
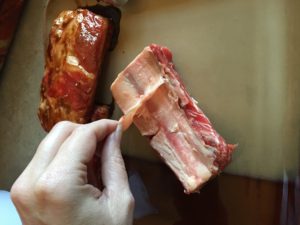 |
The backside of Beef Ribs is very fatty, but also has a thick layer of skin membrane. Some folks ignore this and just cook it as is. |
I prefer to remove this skin layer as it acts as a sealing barrier against marinade and keeps some of the fat from cooking off. To each their own. I just wanted to point out that it’s there, in the event that you’d like to remove it also.
–
The Chinese Style Ribs Marinade
I’m using the term marinade rather than brine because there’s no salt in this mixture. There’s a lot of opinion as to the actual differences between the two, but for me, it’s simple:
A BRINE – is a soaking solution designed to add moisture to the meat to help prevent dryness during the cooking process. It almost always includes a healthy dose of salt.
A MARINADE – is a layered coating of a blend designed to add flavor to the meat, which may or may not be completely submerged in the mixture. Usually, if it calls for salt, it is only enough to enhance the flavor.
Whether you think that definition works or not is up to you. It’s how I use the terms and I wanted you to know that up front because we’re going to be making use of both in this recipe.
THE MARINADE – This is a simple mixture of a few ingredients designed to add a distinctive flavor to the meat in over a 24-hour period. It will include the Hosin Sauce, the Worcestershire, the Honey, the 5-Spice Powder, Garlic, Ginger, Brown Sugar, and Onion. The measurements that I’ve listed provide around a cup and a half of marinade. It’s hearty, not watery and thin. As such, I don’t feel the need to make enough to totally submerge the meat. It will stick to the meat and slowly drip off. You can use a large, non-metal mixing bowl or cooking dish to marinade the meat. Layer it into the container and cover the top of the meat with the marinade. If you have enough meat to necessitate multiple layers, save some marinade for each layer. Remove the meat from the bowl or dish every six hours or so, and pour the leftover marinade into a smaller bowl or mixing cup. Reposition the meat, rotating the layers if you have them, and pour the marinade back over the top of the meat.
NOTE: If you have a thick gallon sized Ziploc bag and you’re comfortable using it for this process, feel free. Just give the ribs a good look and check for sharp edges on the bones that might puncture the bag. This is the only reason I don’t use a bag in this stage. It’s far easier to pull this out of the fridge every few hours and give it a jostle, but frustrating if you happen to puncture the back in the process.
THE BRINE BATH – This is a much shorter process and, confession… it’s really a faux brine (there’s no salt). Appearance is of the major things about food that adds to the appreciation and appeal. Let’s be honest, regardless how you mix the salad, it’s still going to taste like salad. You’re still going to be able to pick out the individual ingredients by their flavor and you’re taste buds are never going to know the difference of whether you’re eating from a shaken Ziploc bag, or a beautifully presented dish at a table with a window view of the historic harbor. But, you’d pay more for that wedge of lettuce with a string of Caesar, a sprinkle of grated cheese, and some properly placed croutons AND…. you’d enjoy it more.
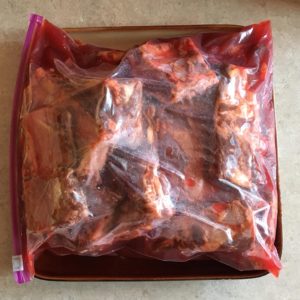 With Chinese Style Ribs, the expectation is that they are going to have a distinct redness to them. Hey, we’re not going to get that from the marinade and it’s not going to magically show up during the smoking process. This is the stage where I add a little bit more flavor and moisture to the meat, along with the traditional red hue. For this stage, we’re using the Apple Juice, Apple Ale, Bottled Water, and Red Food Coloring. This mixture is a simple 2 to 3 hour soak, primarily for the purpose of appearance.
Remove the ribs from the marinade and stand them on their side so that the marinade can drip off while you’re prepping the brine. Do not throw out the marinade; we’re going to use it during cooking. Mix the ingredients in the gallon-sized Ziplock bag and add the ribs. Lay the Ziploc bag out flat on a plate or set the bag in a bowl, to protect against leakage, and return it to the fridge. Let it stand for 2 to 3 hours so that it has time to soak up the apple juice and color. Flip the bag every 45 minutes or so to help with an even blend of color and flavor.
Following the soak, pour about 1/2 to 3/4 cup of the brine into a bag with the marinade. We’re trying to thin the marinade and add a little bit of the apple flavoring, along with the coloring. We’ll make use of this as a moisturizing bath every hour or so during the first part of the smoking process.
–
The Smoking Process
This process is fairly easy, but it’s not set-it-and-forget-it. We’re cooking, not waiting for Amazon to deliver a package. It’s not hard, but it requires your involvement. I do the vast majority of my cooking on the smoke setting. I want to cook in some of the flavoring and also give the meat a chance to soak up some of the smokiness that the #Traeger will add to the slow-cooking process. Hashtag, cooking is an art.
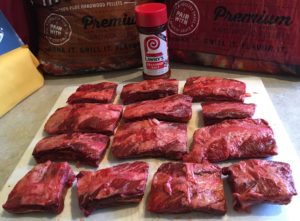 I lay the ribs out on a metal rack to drip, then spread them out on a cutting board and give them a light sprinkle of Lawry’s Seasoning Salt before putting them in the smoker. After an hour, I’ll pull the ribs from the smoker and give them a bath in our leftover marinade. I pull all of the ribs at once, because I don’t like to open and close the smoker any more than necessary, but I tend to slosh the ribs around in the marinade 3 or 4 ribs at a time. When I pull them from the marinade bath, I put them on a metal rack to drip a little before I return them to the smoker. Again, if they’re going to drip marinade, I’d prefer that they do it on a plate in the kitchen so that I have that little bit of drip-off to use for the next bath. I really don’t see a point to letting the excess marinade drip on the drip pan and burn.
I repeat this process every hour three times. That gives us 1 hour of smoke, bath #1, 1 hour of smoke, bath #2, and 1 more hour of smoke before bath #3. By this time, you’ll probably be nearly out of marinade. Following the 3rd bath, I return them to the grill for about 30 minutes. This time allows for the last of the marinade to be cooked into the meat.
On the heels of the last smoking period, I pull the ribs and wrap them in aluminum foil. Even though they’re cut into shorter segments, the bones will still have a little bit of natural curve. If you have sharp edges in the bone, try to turn them inward to avoid puncturing the foil. Once wrapped, return them to the smoker for 90 minutes of cooking time. This will continue to cook the ribs to the point of being fully done and make them a little more tender in the process. It also helps to keep them from drying out. Set a timer, so that you don’t forget them while you’re making the glaze.
–
Glazing The Ribs
I make the glaze from scratch as the ribs are entering the final half hour of smoke time. You can buy a glaze, but it’s not nearly as good as what you can make from scratch for a fraction of the price. Making your own glaze isn’t difficult, it just requires some patience. The shopping list of ingredients is listed in the table above. A tip that I learned early on: Ketchup doesn’t blend easily. It will break into smaller clumps or pods and just float around in the glaze, pumping up your anxiety levels.
Mix the ketchup and the Worcestershire Sauce in a measuring cup before adding them to the pan. You’ll be able to stir them vigorously and get a better blend of the two. You can add the other ingredients straight to the pan as you measure them, but mark my words… the ketchup is a pain, if you just add it to the pan without doing this. Give the liquid ingredients a few minutes to warm up before you add the Brown Sugar. It will melt in the warm liquid blend and the glaze will be easier to stir.
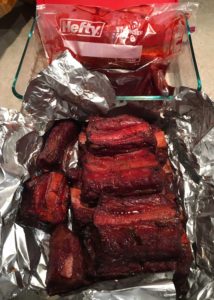 I start this process when the ribs get to the final 15 minutes of their cooking time. If you’ve set your timer, you can pull the ribs from the smoker while your glaze is still reaching temperature on the stove top and set them aside to cool down enough for you to handle.
Make your glaze on a low heat. If you have a convection tabletop, set it at 150 and lower to 100 once you see a hint of steam. If you’re working with a conventional stove top, start at a medium-low heat and turn it down notch by notch as steam develops. You want to keep it hot enough to give off steam, but you’re not looking for a bubbly boil. If you see bubbles, remove it from the heat immediately and turn your dial down a couple of notches.
–
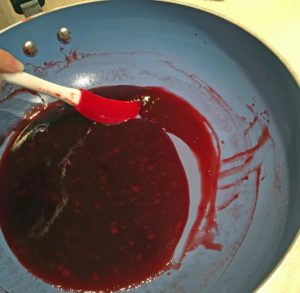 The sugar will cause the glaze to slowly thicken over the course of about 15 to 20 minutes. As it thickens, you’ll notice that the bottom of the pan will become visible as your spatula moves slowly through the glaze. Once you’re getting about an inch of trailing visual, your glaze is ready to remove from the stove top. Do not simply turn off the heat; remove the pan from the stove top. Continue to stir and it will continue to thicken. After you remove it from the heat, it will take 2 to 3 minutes to cool down. At that point, you’ll notice the trail of visual pan bottom will be well over an inch.
Your glaze is ready. Let it cool for another 2 to 3 minutes, then pour it into a gallon-sized Ziploc bag. Hopefully, you didn’t forget the ribs and they have cooled down. If the ribs are hot off the grill, they’ll cause the Ziploc bag to get sticky and give off a residue, or even worse, spring a leak. You don’t want either.
–
The Final Stage
You’re one step away from magic. Spread a sheet of tin foil over a cookie sheet. This makes your final clean up much easier. (Scrubbing burned on glaze off of your grill rack is something you want to avoid… trust me!) Roll the ribs 3 or 4 at a time in the glaze and lay them out with the meaty, curve side up on the foil. If you’d like, you can sprinkle some diced onion across the top of the ribs. It looks nice and adds to the flavor if your family likes onion.
Place the cookie sheet on the grill rack and turn the grill up to the 225 setting (#3 on the dial). My grill will reach a temperature of 300 at that setting, but it won’t sustain it. At this stage, the ribs are cooked. You’re cooking the glaze into them, more than you’re cooking the actual meat. Give it a look at about 30 minutes. If the glaze has blackened, it’s time to pull them off and let them cool. If it’s just starting to turn and blacken, you may want to leave them on a little longer. Each cook to their own level of crustiness and appearance.
I hope you enjoy this recipe. Let me know how yours turns out.
–
Disclaimer – Every grill is different and every day is different. If my grill maintains an average temperature of 173 degrees on the smoke setting during an 85 degree afternoon in June, with a high temp of 212 and a low temp of 153, that average and range is going to be measurably different on a 40 degree day in January. All of my recipes are written with that 85 degree day in mind. Adjust accordingly if you’re trying to duplicate my recipes and it happens to be 40 degrees where you’re using your grill. You may need to adjust to a higher temperature setting or allow for a little more cooking time. #CookingIsAnArt
–
Quick Links to Mark’s Books on Amazon:
| PUSH Mark D. Combs |
Don’t Forget Your Cape Mark D. Combs |
HELLO… IS THIS ON? Mark D. Combs |
–


