

HOMEMADE BEEF JERKY
–
 Two years ago, my wife bought me a Traeger Pellet Grill for my birthday. I know, old news… well, here’s a gotta-make item that works its way into the rotation every 90 days or so… BEEF JERKY!
The next time you happen to be somewhere that sells a name brand jerky, check out the pricing. Here, the average price in the grocery store is a whopping $7.99 for a 3 oz package. Even on Amazon, you’re going to find that it’s priced in the range of $1.50 per ounce. That’s a much better buy than you’ll find in stores, but it’s still a little pricey.
We’re going to start with a cut of roast that you can usually find for $4.99 a pound, sometimes less, and make a jerky that you’re going to really enjoy having in your secret stash. Even if you’re not eagle-eyeing the sale price, that comes out to around 31 cents per ounce for your finished product. I think I picked up the two roasts in the picture to the left for $3.69 a pound, on sale.
Here’s your step-by-step
how-to-make-magic-happen
inside scoop.
–
Here’s your ingredients…
|
|
–
First, some ground rules…
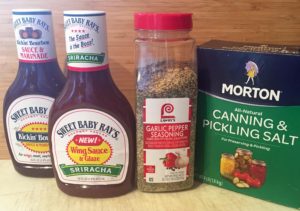 There are a few things in the list of ingredients you can substitute to your own liking and a few that you really shouldn’t. I’ve learned from experience, which is why I’m posting the blogs. Don’t waste your time and money repeating my mistakes. You’ll see that I specify Worcestershire Sauce and highlight that you should not substitute Soy. Soy Sauce is much more salty than Worcestershire. It has it’s place, but this isn’t it. I was short on Worcestershire once and made the mistake of substituting; the jerky turned out to be way too salty. I managed to eat it, but I didn’t dare share it proudly with our circle of friends and my wife found it to be a taste bud assaulting gag fest. Play it safe here.
When it comes to the flavoring sauces, feel free to experiment a little. Just keep in mind that you can always spice up the next batch, but you can’t remove what’s in the marinade once you’ve brined the beef. Both the Kickin’ Bourbon and the Sriracha have a pretty enjoyable bite; the Teriyaki Sauce is more sweet than spicy. (See below for notes on the Teriyaki Jerky.) Adding a little crushed red pepper to make the spicy flavor a little more hot might feel like a good idea, but it might push the finished product outside of the enjoyable spicy range for some folks.
Proceed with caution and care. Once you make your first successful batch of Beef Jerky, you’re going to find yourself slicing and smoking another batch every other month or so. If you want yours hotter, you can personalize your marinade recipe little by little as you go. One thing that I’d like to try, but haven’t yet, is adding pineapple rings to Teriyaki Jerky during the first hour or so of the smoking cycle. I normally use Hickory or Mesquite wood pellets for jerky, but to each their own. Some people are fond of Pecan, Alder, or Oak.
Technically, I don’t know the difference between Morton Canning & Pickling Salt and Morton Ionized Table Salt, but for the price of a 4 pound box, that’s going last you for several rounds of jerky and also come in handy with other brine mixtures, don’t substitute. The water? We drink Dasani. Nothing else really tastes good to us. When it comes to the water, use bottled water as opposed to tap and pick your own favorite brand.
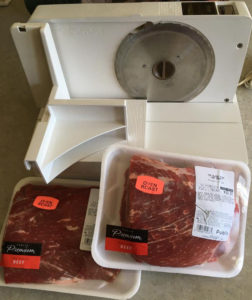
The meat slicer is going to be something that comes in handy in the kitchen from time to time. It’s well worth it to invest in one for this project, as trying to hand slice the roast at equal thickness can be a challenge. If the slices are too thick, it can take forever to smoke and you end up with less jerky. I slice mine just a little thicker than a quarter or house key. Find your own Goldilocks Zone.
–
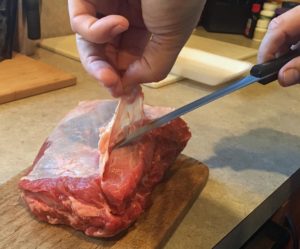
Let’s Talk Meat!
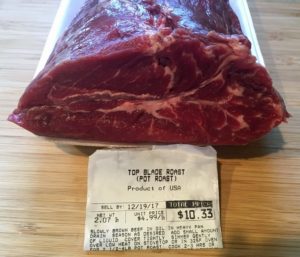 In the ingredients section, I specified a Top Blade Roast. I’ve found that in different areas of the country, different names are given to certain cuts of meat. In this case, I wanted to provide you with a side view of the roast so that you could see the defining features. This particular cut of beef has a noticeable gristle that runs horizontally through the center of the roast. This isn’t a problem that you need to worry over in your prep. The majority of the gristle (unless it’s a really thick vein) cooks out during the smoking.
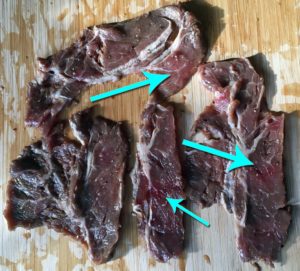
There are two things that you do want to pay attention to, however. The first is the overall fat content. In smoking jerky, fat isn’t necessarily a good thing. You want a fairly grainy cut of beef, with a little marbling, but not heavy veins of fat. Also, this cut normally tapers from a thick end (shown) to a rounded tip. Take a look at the tip. You can’t always tell, but if you can see that it looks like the muscle tissue is separating, it might fall apart when you get to the last inch or so of the tip during the slicing process. Try to find a roast that’s been trimmed at both ends and you’ll get more usable slices out of the roast that you pick.
I use a meat slicer that I inherited from my mother. I’m including a link to one on Amazon that looks to have high ratings and is affordable. I’d order the larger blade, if it fits the budget. You don’t have to have a high end slicer, but don’t grab the cheapest thing on the market either. Look at the ratings and comments, then pick out something that is going to be a quality addition to your kitchen. Once you have it, you’re going to use it; I promise.
–
Trimming and Slicing…
 |
 |
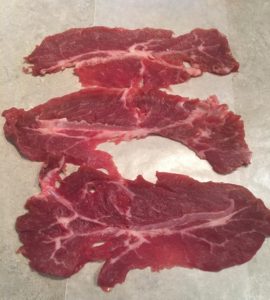 |
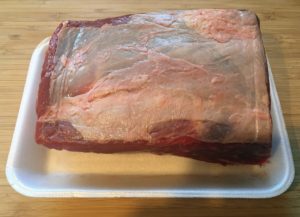
You probably don’t need a lot of direction here, but I’ve added some images that may be helpful. The bottom side of the roast is going to have a solid blanket of fat. Take the time to trim this. The slicer will cut through it, but you don’t want it attached to the jerky. It’s like chewing a plastic straw and doesn’t add any flavor to the end product.
When slicing the roast, you can turn it over every 4 or 5 slices or keep it the same side up at all times. My slicer tends to leave a growing edge of leftover meat at the bottom, so I tend to flip my roast during the process. The slices cut more evenly if you don’t flip it, which is why I don’t flip after every cut. Your slicer may not leave behind this uncut portion. If that’s the case, your slices should turn out even better than mine. Another trick that has proved very helpful is to put the roast in the freezer for 3 hours or so before slicing. A firm, heavily chilled roast maintains its shape much better during the slicing stages. Adjust freezer time to suit the size of the roast. Good times!
–
Make your brine… Brine your meat…
 This is an easy process of add and stir. I tend to blend my ingredients in a 3 quart pot so that I can heat it gently and have room to stir. You’re not really cooking anything, but a little bit of heat helps to blend the sugar and the garlic in the pepper mix. I always let it cool before adding the sliced meat.
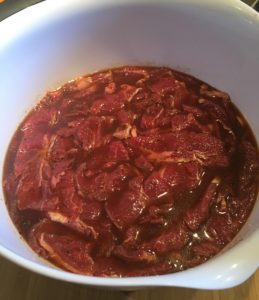
One tip that I will offer is with regard to adding the sliced meat to the brine. Keep in mind that the meat has been sliced and that as such, it will have a tendency to fold over on itself and other slices. This makes for areas that don’t get fully exposed to the brine. For this reason, I add the meat to the brine, as opposed to pouring the brine mixture over the meat. Add a 6 to 10 slices at a time and slosh it about a little. I also remove all the meat from the brine after the initial overnight soak and then reintroduce it slice by slide for another 5 or 6 hours of marinade time. You can see by the picture what it looks like when you pull slices out of the first overnight soak. I’ve never had a batch that looked like it got fully exposed.
 I used to soak everything in the 1-gallon Ziploc bags, but I’ve found that by doing the first overnight soak in a large bowl, the meat actually gets a better overall marinade. I actually struggled to find a few slices that displayed the unexposed portions that I referenced above. See image to the left for an example and know that it’s sometimes much more prevalent. I’d still use the Ziploc bags after the first pick through, if I were going to let it sit for another day in the marinade. It tends to take up less space in the fridge that way and I think it better protects the meat once you’ve got it submerged in the brine to the point where you can squeeze the excess air out of the bag before sealing.
–
It’s time to smoke…
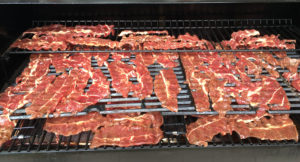 After it’s had plenty of time to marinate, it’s time to smoke. Putting dripping meat in the smoker creates a clean up mess on the grill plates and the drip pan. I pour mine through a strainer in the sink and then transfer piece by piece into another strainer. Don’t worry that you’re losing marinade. What you want has been absorbed by the meat. Let the excess drip away; it will make grill clean up easier; trust me.
This is a slow smoke process that’s going to take 5 hrs or longer. Since I can’t shove a meat thermometer into a thin slice of meat, I’m trusting look and feel when it comes to cook time. The slices will turn to a rich, dark color as they’re approaching Done-ville and not all pieces will be ready at the same time. Parts of the smoker are hotter than others. If you haven’t figured that out yet, you need to start paying attention to it, because it will help you when you’re using every inch of grill plate. As the jerky appears to be entering a final stage of cooking, start sampling a piece from the hotter area of the grill plate. It should be hard and stiff, but tender. It may have some faint grill marks, but it shouldn’t stick to the grill. If it’s still juicy, it’s not ready. If it’s dry, and starting to lighten in color, you may have waited too long.
One last tip. This is beef. It’s grainy and it has a measure of fat in it. This means that as it cooks, some grease is going to bead up on the surface of the meat. Once you take it off the grill, lay it on a layered mat of paper towels and pat it down with a thick folded up paper towel to remove some of the grease beads. The jerky is smoked, so it will keep just fine in a sealed package for a couple of months without refrigeration. If you don’t dab off the excess grease, it will still keep just fine, but it’s going to have a blotchy appearance and you may be able to taste it on some pieces. Take the time to dab and enjoy your jerky!
–
Special Notes for Teriyaki Jerky…
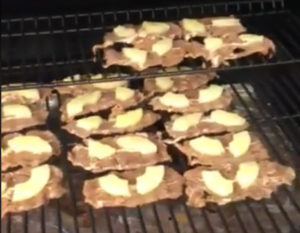 The brine recipe needs to altered slightly for this flavor. Obviously, the Teriyaki Sauce is substituted for the Kickin’ Bourbon or Sriracha option, but you’ll also want to cut the Brown Sugar back to 1/3rd of a cup, rather than a full half. Sugar is sweet, but too much is too much. The other alteration that I made was to use the pineapple juice from the can of pineapple rings in place of the apple juice. There’s more than half a cup of juice, so you’re fine to pour what you need for the brine, then cover and refrigerate the can of rings overnight. Another additive, if you like a little bit of spice on top of the sweet, was to add a teaspoon of crushed red pepper flakes. You can add more, if your goal is a hot-sweet flavor, but it’s always best to start with a hint of heat and inch your way toward the final level of hot that you enjoy.
You’ll see in the picture, that I also cut the pineapple rings into quarters and positioned them on top of the jerky during the initial smoking stage. I left the pineapple in place for the first 90 minutes or so, but then put it on a separate metal mesh to finish smoking. I pulled the pineapple out of the smoker after about 3 hours. I wanted maintain a little of the juicy texture, as opposed to seeing it completely dry out. Later that evening, I had served the smoked pineapple with crackers and cream cheese. It was delicious!
I hope you found this recipe helpful and are tempted to give it a go.
Let me know how yours turns out.
–
Quick Links to Mark’s Books on Amazon:
| PUSH Mark D. Combs |
Don’t Forget Your Cape Mark D. Combs |
HELLO… IS THIS ON? Mark D. Combs |
–